How to Install Permanent Fuel Tanks
Fuel Systems > How to Install Permanent Fuel Tanks
Whether you're replacing an old, damaged fuel tank, or adding an additional tank to your boat's fuel system, safety is the most important thing to remember. After reading these instructions completely, if you are unsure of any of the detailed procedures, seek professional assistance.
iboats.com offers an extensive national network of independent, professional marine technicians. Click here to find your local Amtech dealer.
Before You Install
- Gather the necessary tools: tape measure, flat-blade screwdriver, pliers or wrench
- Determine the best placement for your below deck tank. This is most likely where your old tank was positioned. It should be where the vent and fuel hose connections will form the shortest line.
- Remove your old tank.
6 Easy Install Steps
-
1. Secure new fuel tank into position. We recommend using Moeller's Permanent Fuel Tank Hold Down Kit (Part #35710). DO NOT use foam to secure tank in place.
- Slide two large hose clamps onto fuel fill hose and leave loose.
- Slip the hose over the tank fill fitting and secure by tightening clamps into place from the end of the hose.
- Tighten the second clamp, leaving a 1/8 gap between the two clamps to ensure that the clamps do not touch.
Note: Coast Guard guidelines require the use of two clamps. - Connect an earth-end-ground wire to one of the two terminals found at the base of your tank's fill neck and use a stainless steel split ring lock washer and screw fitting to secure. Likely grounding sites may include metal surfaces on your engine mount or outdrive. Grounding wire should not be attached to a painted surface and should be checked regularly for corrosive buildup. The ground wire will help avoid a dangerous build-up of static electricity in your fuel system.
- If your tank does not have a molded on vent, thread a hose barb into your tank's vent. Do not over-tighten. We recommend the additional use of a gasoline and diesel resistant seal compound to guard against leakage.
- Slide a small hose clamp onto the vent hose and leave loose.
- Check hose length from the thru-hull vent to the tank and trim as needed to avoid kinking.
- Slide the end of the vent hose over the vent fitting and secure in place by tightening a hose clamp from the hose end.
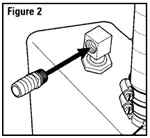
- Attach a hose barb into your tank's fuel withdraw. (See Figure 2) Do not over-tighten. We recommend the additional use of a gasoline and diesel resistant seal compound to guard against leakage.
- Slip a hose clamp onto the withdraw hose and leave loose.
- Check length of hose and trim as needed to avoid kinking.
- Slip the hose over the tank withdraw fitting. Secure in place by tightening hose clamp from the end of the hose.
- A leak test should be conducted around seals and connections. Pressurize the tank to 3 PSI then use soapy water to look for air bubbles around these areas. Seek professional assistance if unfamiliar with this test.
- Connect sender wire from fuel gauge to the threaded screw terminal on the fuel sender. Use nut and washer to secure wire in place.
- Connect a grounding wire to the fasson terminal on fuel sender.
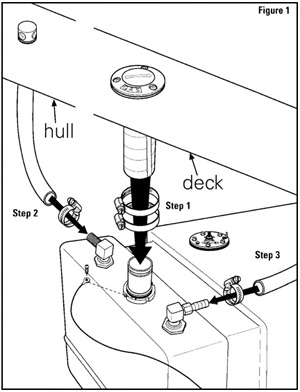
2. Attach Fuel Fill Hose (See Figure 1, Step 1)
3. Attach Vent Hose (See Figure 1, Step 2)
4. Attach Fuel Withdraw Hose (See Figure 1, Step 3)
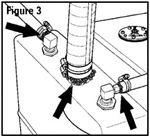
5. Test for No Leak Install (See Figure 3)
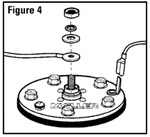
6. Proper Sender Wiring Installation (See Figure 4)
Shop All Boat Gas Tanks & Fuel System Parts
Sign Up to Receive iboats.com Review Newsletter: Includes 'How To' tips, special sales, and more.
Disclaimer for iboats.com Review Articles:
Copyright Notice:
The information and articles provided in this e–monthly and/or in any publications provided by iboats.com are for general purposes only and intended to help you make better decisions about your boat and boating equipment. Such information is not intended to substitute for instructions from the manufacturer, dealer or marina about your specific boat or boating equipment and iboats specifically disclaims any liability for damage to your boat or equipment arising from your following suggestions in this e–monthly. For more details about your equipment or application, we suggest you contact the manufacturer of your boat or other equipment.
All materials contained on the iboats.com site and on this Review publication are protected by United States copyright law and may not be reproduced, distributed (except for use of the iboats.com "Email to a Friend"), transmitted, displayed, published or broadcast without the prior written permission of iboats.com or in the case of third party materials, the owner of that content. You may not alter or remove any trademark, copyright or other notice from copies of the content.
