


 Boats for Sale
 Advice
Se Sport High Performance Hydrofoil


Improve your boat’s performance by installing the SE Sport High Performance Hydrofoil. It features a crescent shaped surface that helps your boat achieve quick hole shot by funneling water for increased thrust-cutting planning time. Its Turbo Trac increases thrust and control for smooth rides with better handling and maneuverability. It keeps boat planed even at low speeds, boosting performance and fuel efficiency.
This hydrofoil is made from one-piece high strength copolymer for extreme durability. It can be fixed to the cavitation plate and includes stainless steel hardware for convenient and durable installation. This hydrofoil can be used with both outboards and stern drives.
- Single piece, high strength copolymer construction
- Turbo Trac feature improves thrust and control
- Crescent shaped surface for faster hole shot
Features of the SE Sport High Performance Hydrofoil
- Improves handling
- Offers smooth ride with better maneuverability
- Allows boat to plane at lower speeds
- Attaches to cavitation plate
- Includes stainless steel hardware
- Works with both outboards and stern drives
Specifications
Manf. Part # # 71614
- Type: SE Sport 300 high performance hydrofoil
- Application: 40-350HP Motors
Manf. Part # 72424
- Type: SE Sport 200 high performance hydrofoil
- Application: 8-40HP Motors
Manf. Part # 73737
- Type: Replacement hardware kit for 200 or 300
Manf. Part # 73738
- Type: Hardware for Volvo with exhaust thru cavitation plate
Manf. Part # 74644
- Type: SE Sport 400
- Application: For 40-unlimited HP engines
SESport 400 Installation
Video Transcript
Today we are installing the SESport 400 on a Contender with twin 250 Mercuries.
First thing you want to do is remove the trim cover, the top piece. There's a little lip that's going to slide forward.
So with the rubbing alcohol you want to clean real good where the disk-grips are going to go. So the most important part to be clean is the bottom of the cavitation plate on both sides, and then it also grips on the top sides as well.
Once you determine the proper position for the disk-grips, some of the packages will include a blue sticky. Your package may have a red sticky, and these are going to go right on top of the cavitation plate, right above where the disk-grips go, and that's going to stick to the top of the foil. And then of course before you're ready to put the hydrofoil on, go ahead and remove the 3M, it'll either be 3M paper or just regular plying paper.
There are two sizes of bolts. The longer ones are for the aft end, the wider end of the hydrofoil. On the aft end you get these long ones, and the short ones are for the forward end.
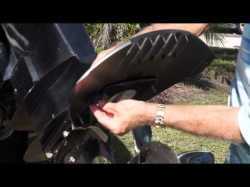
Line up the hole, drop it straight in, see how there's a little lip, it's raised up, so you can turn the top of the bolt until it drops straight down and flush with the top of the D washer.
Slide the disk grip up through the hole, hold the top of the bolt. With your finger, slide the large washer on first, now here's the smaller washer, and then last is the lock nut. Of course the rounded part of the lock-nut goes on the bottom, just tighten it up, finger tight. You'll feel the plastic lock threads get secure.
So after you get all four disk-grips on, we're going to tighten them up in an alternating pattern, and we want to tighten these down very snug.
As you're tightening, you'll start to see the rubber of the disk-grip to compress. That's what you want. You want the rubber to compress and even squeeze out a little bit from the cavitation plate, even up to an eighth of an inch, because that's what's going to hold secure. So tighten it down snug and then we'll come back and do a little bit more tightening after we tighten it in an equal manner.
So they're squeezed out nice right there, squeezed out nice there, after you finish, do a tug. That's not going anywhere. That is rock solid.
Trim plate, phillips screwdriver, stainless phillips screw. You want to slide the trim plate all the way forward, so you're pushing down and sliding aft at the same time, pushing down and sliding aft. Phillips screw, just line it up.
That's it, very simple, about a ten minute installation, rock solid fit, one more to go, five to ten minutes, and we're off boating. Hope you enjoy!


